Notes on code, technology, caffeine and everything in between.

Automated Deployments


Until now, I used to write a blog post and just run a shell script called deploy.sh that runs a hugo build command and rsyncs the whole folder to my dockerized web server. I wrote a post about that a year ago.

I was fine with that, until something in my environment broke and I had to tinker around until it worked again. So I’ve decided to re-build the deployment process using github actions. Now by blog gets deployed automatically everytime I run ‘git push’, which is amazing for someone like me, who is lazy and has no time to waste.

It turned out that I had to spend more time failing to automate the whole thing than I’d rather spend on just running deploy.sh, but I’ve learned some things.

As posting the whole script would be a slight overkill (and google is full of examples), here’s only my key learnings:

  • Checking out another Git repo than the one of the blog is a pain, as you need to generate at least an access token if it is a private one (my theme is that kind of repo)
  • The repo running the action is always checked out into branch name (main in my case) as a folder name
  • Using github secrets for storing server auth data is quite cool but I have no clue how they securely store that stuff
  • There’s an action plugin (are they even called plugins?) for almost anything you need, but it never fits 100% of your needs
  • Debugging a Github action is a pain

But hey, when you read this post, it got automatically deployed!

// edit: also, I am now able to write blog posts from any device with a web browser, using Github code spaces. [sent from my iphone]

ZSA Voyager


As I’ve already mentioned, there is a lot to say on this topic. So I decided to write a part two about it. This serves also as a braindump for myself so I remember why things are how they are in the future.

Here, you can still follow the progress of my keyboard layout git

What’s in the box

The keyboard comes with a case for easy transportation, a key puller, spare switches, magnetically attached feet for tilting and loads of keycaps, some blank and some with other letters having homing bumps than F and J, so it better suits Dvorak or Colemaor other layouts. Also it comes with three different lengths of USB-C cables as it is a wired keyboard, and one TRRS cable to interconnect both units.

Just a very minor complaint here is the TRRS cable, I’d wish there was a shorter one included, as it doesn’t really match the sleek aesthetic of the Voyager having a cord that is too long in the center of your desk.

Setup on macOS for German language keys

That did cost me some time to get it right, but it is quite easy if you follow the instructions by ZSA.

In short:

  • when connected for the first time, press any useless key and select ISO as Type when prompted
  • head over to settings > keyboard
  • go to configure keyboard layout and change from ‘German’ to ‘German - Standard’, otherways all special keys like /|= will not behave as expected
  • in ORYX, ZSA’s configuration software, enable German in Settings > Internationalisation
  • also in ORYX, use the ‘de’ labeled key functions if available

The Layout

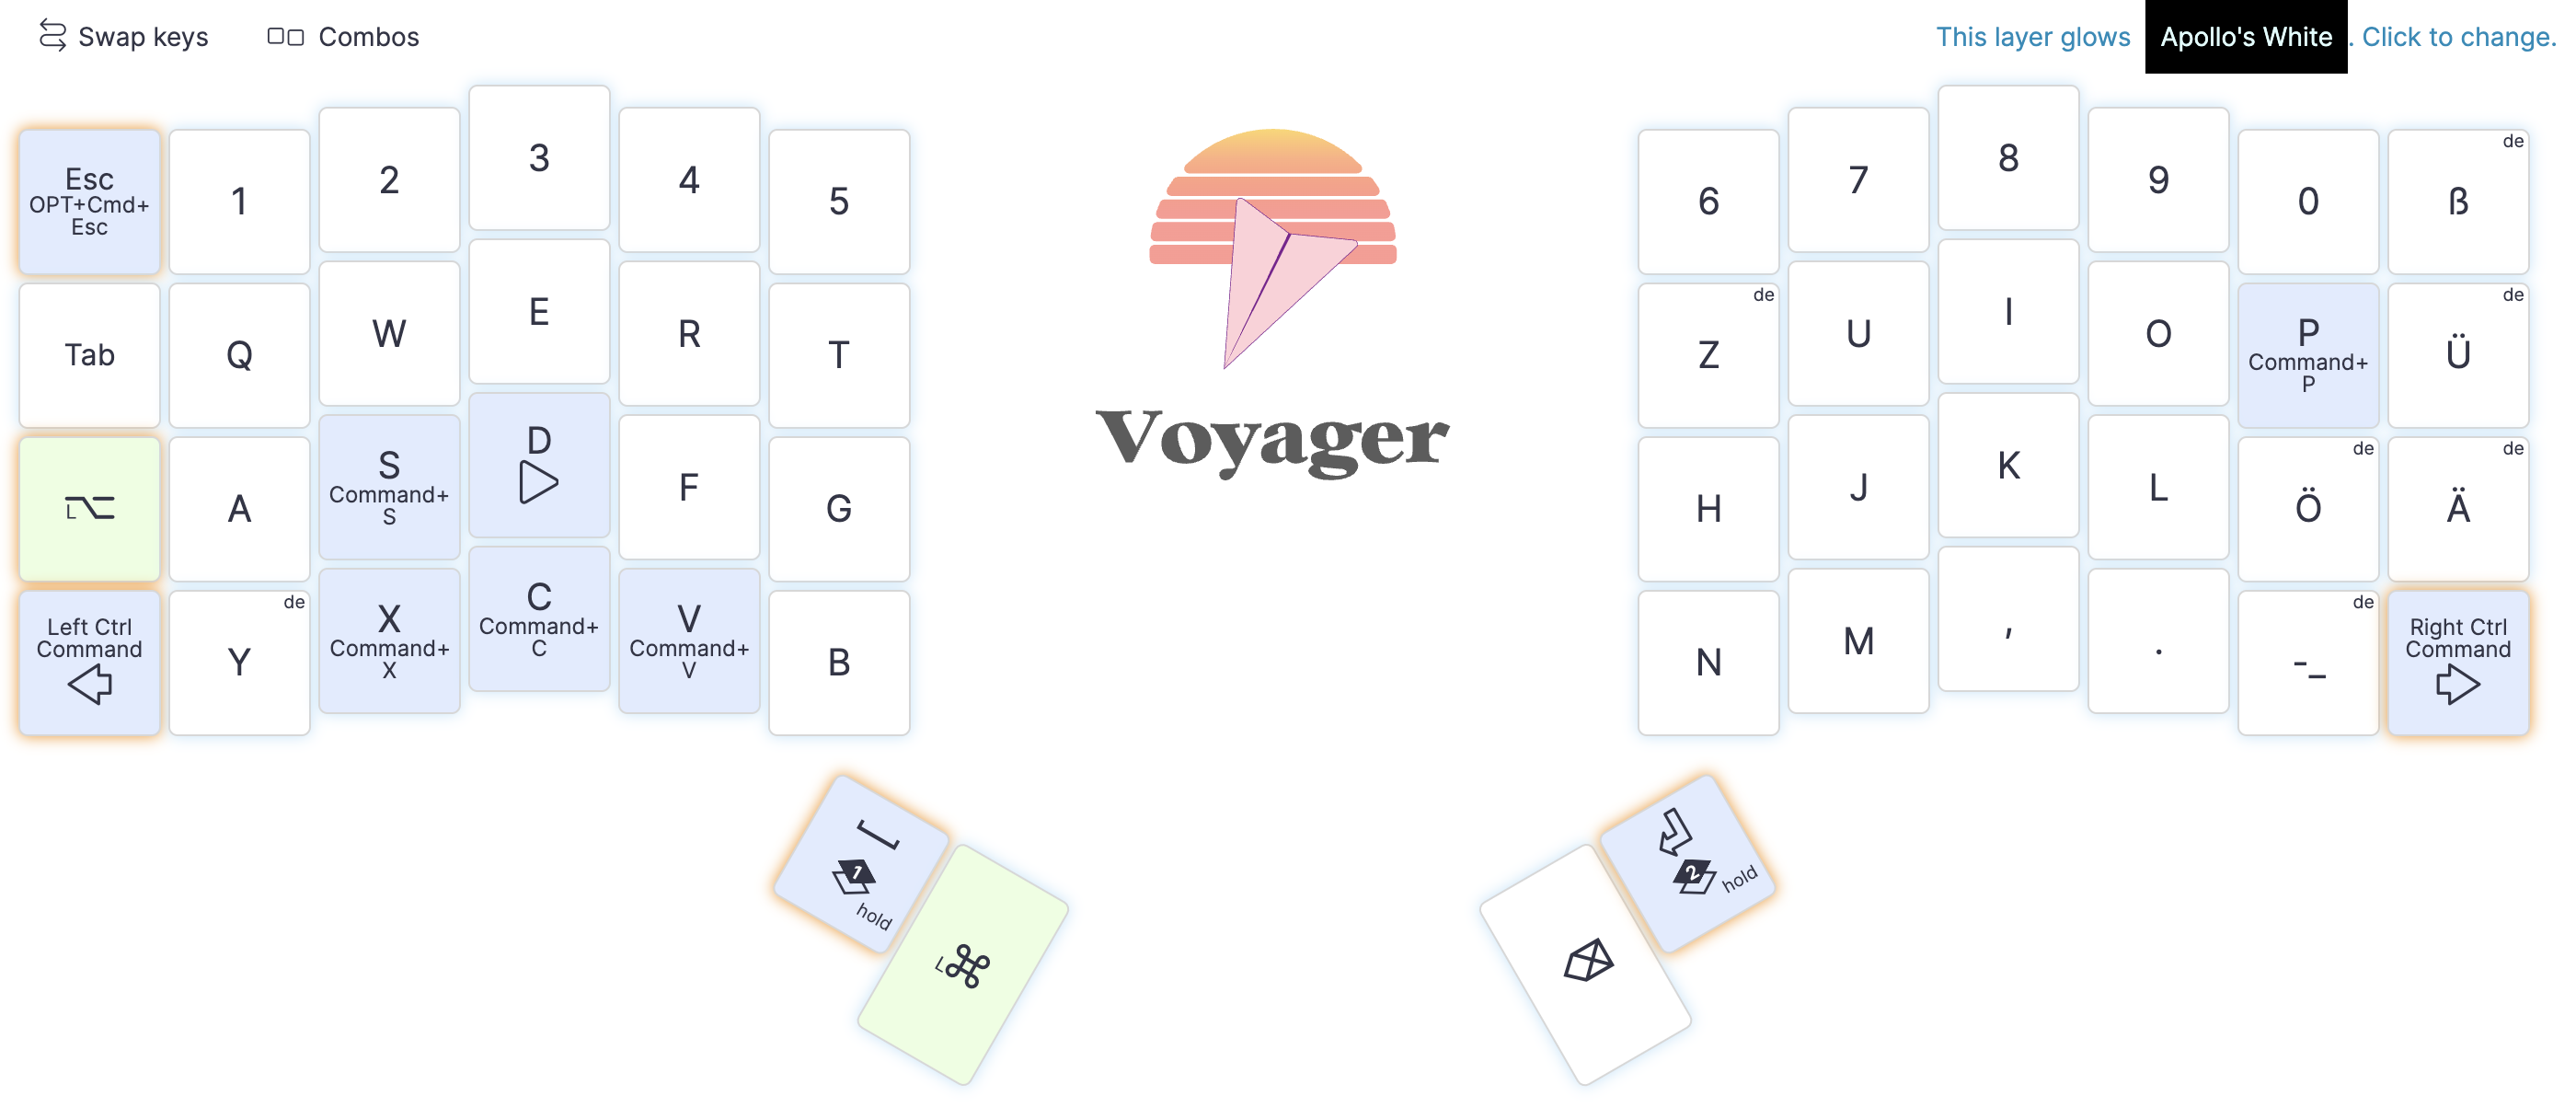
The layout v1

It requires lots of tinkering with the keyboard and also trial and error when it comes to actually using it. As stated in my previous post, I am not bold enough yet for alternative layouts, even though I’ve thrown an eye on Colemak. But I need to be able to use the PCs of others at work, and they use QWERTZ.

So for my convenience, I tried to create a layout that is basically QWERTZ, but fixes some flaws with special characters I’m always having.

In the moment, I got rid of using shift completely and try to just use Auto Shift, which is triggered by just pressing the keys a slight moment longer. But that brings up various new challenges, like how to take a screenshot without the shortcut that requires pressing a shift key. I think mapping special shortcuts or combos to my third layer might be a way out.

Also, I want to be as minimalistic as possible, to not spend to much time learning fancy new stuff at first.

Memorizing Keys

That might be my biggest issue so far. Memorizing the letter and number keys is easy, as they didn’t change their positions at all. But there’s also muscle memory and that needs to be re-trained as well. I have developed a strange issue over the last decade, I’m always reaching for the B letter with my right hand, even thouth that is not logical at all - and on a split keboart not possible.

The other two things are special characters and shortcuts. For special characters, I tried to also copy as much as convenient from the german mac keyboard layout. For the other ones, I try to optimize for coding as good as possible.

I think to help me out with that, I’m gonna setup some tweaks with the RGB backlight next.

Special shortcuts

From my early days with the mac, it used to be called OSX, I am a keen user of spaces to organize my work and the load of applications on my desktop. (That’s why I think bringing stage manager to the mac was completely useless) Back then, there was no official shortcut to switch spaces, so I created my own, ‘CMD + [Arrow Left/Right]’. This shortcut became second nature for me. On the Voyager, I try something new and switch spaces by double tapping the keys bottom left/right. Feels good so far.

Also something on mac I never liked was the shortcut to open the ‘fake task manager that’s actually working’ using ‘CMD + ALT + ESC’. I streamlined it to holding the esc key for a bit.

And one more new feature regarding shortcuts: I made the keyboard fire the shortcuts for firing save, copy, paste, cut when tapping and then long pressing c,v and the other corresponding keys. Feels good so far.

Ergonomic Keyboards


I’m not gonna lie to you, but in my opinion, keyboards suck. Period. It feels like keyboards were invented a century (or even more) ago in the times of typewriters and just adapted when those first mainframe cmputers came up. And since then, nothing ever changed. That’s strange, isn’t it? Especially when considering the overall speed technology evolves.

The main problem is, that the keyboard layouts we’re using simply weren’t designed with the best ergonomics possible in mind, but with the constraints of mechanical typewriters. And yes, I’m that old, I’ve had the pleasure of taking a typewriting course on an actual typewriter with words per minute measured to pass it. (I was not the fastest kid, but not bad at all.)

The thing with the layout

Most people in the world use some variation of the english keyboard layout called QWERTY. As I’m a german native speaker, I’m used to QWERTZ and a strange arrangement of special keys, which makes coding no fun at all.

There are alternative keyboard layouts out there, like Dvorak or Colemak, which promise to be more efficient when it comes to finger movement and commonly used letters. But In the moment, I’m not bold enough for trying such a radical approach of changjing everything.

The thing with the arrangement of the actual keys

Instead, I went for another optimization rabbit hole: ergonomic keyboards.

The keyboards we use day by day are - who would’ve known - derived from the original typewriter layouts. They had that strange row offset so the hammers could all reach the paper with no interference. The problem with that offset is pretty simple: it doesn’t match the nature of our hands. There were some tries by a maker commuity to fix that and make keynboards more ergonomic by arranging keys in a simple grid layout This is also called ortholinear keyboard layout. there were some tries to build a mass compatible product, like the various versions of a mechanical keyboard called Planck. Also, there was some product called niu 40% (40% because it just had 40% of the size of an original keyboard), but they were never really adapted by the masses. Nevertheless, they look fancy and I’d love to get my hands on one, someday.

Another thing worth considering is the arrangement in one flat surface. The natural position of our hands is not made for that, that’s also the reason why those vertical mouses exist. So the next step of the keyboard evolution was going split and angled. And by using layers, also reducing the overall number of keys, reducing the required travel of each finger. These optimizations could reduce tension in hands and arms and make working with a computer faster.

There are some tinkerers out there building such things theirself, using an open source firmware called QMK or other ones. But geting the PCBs, mechanical switches, housings, soldering everything together and hoping that it works - I’m not a fan. So I didn’t dive too deep into that rabbithole.

Until I felt more and more tension in my forearms, also causing some pain after a long day in the office. i was force t think a bit More about ergonmics than I used to. By accident, I discovered this youtube video. So there exists a company offering prebuilt split mechanic keyboards with customizable layouts and firmware? Count me in! And I can even create custom keys, firing shortcuts directly! Whoa!

Getting used to it

Voyager has landed

The voyager arrived yesterday and in fact, this is the first long text I’m typing on it. Let’s say there’s a steep learning curve. Never did writing a blog post take me that long. Partially because I’m still struggling with the columnar split layout, partially because I’m still finding ways to improve my very basic layout and I constantly recompile the firmware and flash it into the keyboard. (Which works like a charm using their online configuration software)

Things I’ve learned so far

  • Setting it up to work with my german mac and layout is a bit tricky - you have to select that it is an ISO keyboard and select the ‘German - Standard’ layout.
  • Auto Shift is a game changer!
  • Performing my own shortcuts, mapped to keys firing when double tapped of held is just amazing.
  • Building the layout that matches my workflow and ergonomics takes a lot of time.
  • Color coding special keys and layers is nice, but your eyes should be more on the screen.

If you’re interested, you can also follow the progress of my layout on the ZSA configuration website.

I’ll post an update after using it for a while as my daily driver as there are many things I haven’t tried yet, like writing more german texts, coding and also designing stuff using Adobe software. Also I want to try working with it on my iPad as it also features USB-C.

Life Update


When I started this blog almost a year ago, I was thinking about posting somewhat between at least once a month to once a week. Turns out, that was a lie. So I’ll correct that statement to posting once a year, that should be doable.

In my defense, I have some other ‘projects’ going on recently. I’d call it two new full time jobs. I’d say one of them will last for at least the next 18 years and cost me a lot of sleep and will cause some grey hair. The other one will also cause some grey hair for sure. But I’m looking forward to the things to come.

While not sleeping, I’ve started to do some Embedded Software development recently, trying to program an ESP8266 only using LUA and the NodeMCU firmware for that. I’ll write another blog post about that soon. Also, because of the lack of sleep, I’ve decided brewing filter coffee at home is not enough anymore and went on the hunt for the perfect cup of espresso and flat white. Things escalated quickly and puck prep is my new second name.

Frameworks


Choosing the right javascript framework to create a modern frontend is like choosing between pasta or pizza at an italian restaurant. It is simply impossible to make the right choice. For me, this is something highly frustrating.

Coming from jQuery, I didn’t really understand the hype for a long time. With jQuery, we basically stick with vanilla javascript and just have a little more elegant syntax. It helped me realize things faster. I started learning jQuery somewhen around 10+ years ago. Since then, everything has changed. I always had an eye on it, but after more and more time passed, I’ve seen frameworks and their APIs change all the time pretty fast. I didn’t want to build something that will not work only a few years or months from now. Especially, because jQuery is so old that it’s basically stable now.

On the other hand, I have to admit that modern frameworks can make things a lot easier than jQuery or vanilla js, just because you don’t have to reinvent the wheel every time you want to bring some kind of reactivity to a DOM. Which is always the case when using jQuery. But when starting new projects now, it is absoultely time to say farewell from jQuery. But where to go? I’ve tried out Next.js first, as a friend recommended it to me a while ago. I really didn’t like it. Then I’ve tried out Angular and was pretty impressed, especially because it uses typescript natively and the Angular CLI is pretty powerful. But after building a prototype with it, I realized that it is just overly complex and heavy. In fact, I’ve spent more time figurint out why things won’t work as expected and debugging, which really was no fun at all.

So next I decided to try out Svelte, which is probably the most hyped framework out there at the moment. I didn’t like it as well. I just don’t know why. It is probably because I am used to the component based approach of Angular. So I decided to give Vue with Nuxt a try. I am not sure if it is the right choice for me, but I will give it a try. I am currently building a prototype with it and will see how it goes. Feels a bit like a lightweight Angular, which is a good thing. I will see how it goes.

Sometimes I miss the old days, where everybody was building stuff just with PHP, MySQL and jQuery. But I guess that’s just the way it is.

April Fools and Lobster Liberation


First of april again. April fools day. It’s the day where everyone starts annoying other people with fools and it’s okay somehow.

I’ve also noticed in the days of fake news and alternative facts, that it becomes more and more difficult from year to year to distinguish truth from april fools. Especially in the internet. I mean - an open letter from PETA to british rowing pushing to replace the term “catch a crab” by “liberating lobsters”. That must be an april fool - turns out: nope.

Or king Charles travelling in a german ICE and being in time. That must be a joke! I could continue endlessly.

On the other hand, the real april fools get worse and worse from year to year. Especially on Reddit.

But back to the PETA letter, asking us rowers to not say that we’re catching a crab. Don’t get me wrong. I am one of those animal friendly vegetarians pelading to end cruelty to animals by every means, especially in mass farming. But everything in this lobster liberation idea is bad. It’s plain rubbish. First of all, if you have even the slightest idea about rowing, you should know that “catching a crab” is something every rower must avoid at any time. If he catches a crab this means damange to his boat, injuries or even taking a swim due to a capsized boat. So to take it back to the PETA terms: catching a crab is a bad thing for every rower. Would it now be bad to liberate lobsters? I don’t think so - I’d like to liberate lobsters without causing serious damage to my boat.

Dall-e 2 interpretation of a rower catching a crab

Here’s a very expressionist take of a rower catching a crab generated by DALL-E. Even the AI knows that catching a crab is no fun for rowers.

Maybe that whole letter is just made up knowing exactly what I described above and just meant to draw attention to PETA and liberated lobsters. Hopefully it is. If not, I plead for dropping the whole concept of these April Fools’ jokes. Reality is foolish enough.

Digital Mountains


To motivate myself to do some more sport, I signed up for the Rapha rising challenge. It is a digital event, taking place via Zwift, a software that let’s me compete with my roadbike virtually against thousands of others. The Idea is simple. Three days, three climbs, each around 1000m elevation. And to make it a bit more interesting, competing against hundreds of others is also possible and intended.

I did the challenge last year and felt it would be a good Idea to do the same again this year. I don’t even know why.

Some (non-surprising) takeaways:

  • Considering it as a race and fight for each place in the first half when the course is flat is easy, climbing afterwards will drop you to the end of the field.
  • Maxing out day one is easy. Surviving day two is hard.
  • Nutrition is important. I am still hungry.
  • Competing on a roadbike for 22km and 1000hm or more is completely different to sitting in a rowing boat fighting a few hundred or thousand meters.

Rapha Rising, Stage 1

I guess there’s a reason why the saying goes:

better start like an old man and finish like a young god than the other way round.

Tim Wendelboe


I’m back in Leipzig from my short trip to Oslo. Very glad that I - for some reason - decided to take a direct flight from BER to OSL and back, which turned out to be the best decision considering that all other flights from Oslo to Germany were cancelled that day due to strikes.

During the trip, I was really lucky to find a little spare time and rush to Tim Wendelboe coffee shop & cupping room. For those who don’t know: Tim Wendelboe is a legend in speciality coffee. I wanted to visit his coffee shot for ages. I did indeed completely escalate regarding my caffeine consume and was also able to nerd out a bit with the barista. I now know that they brew filter coffee using the aeropress with a ratio of 14g of coffee to 200ml of water on a grind size of 9 at the ek43 for the kenyan Karogoto I’ve had. Delicious!

Aeropress at Tim Wendelboe

In terms of brewing with the Aeropress they use a very simple recipe:

  • Grind 14g of fresh ground coffee directly from ek43 into the aeropress
  • Fill with 200ml of water
  • Stir 3 times
  • Place plunger on top to create a vacuum, wait one minute
  • Remove plunger and stir again for 3 times
  • Press down until no liquid comes out, ignoring the ‘hissing’ noise
  • Drink coffee

Of course I got some coffee there and brought it home. I was able to reproduce the original coffee taste pretty well at home, the only variables seem to be water temperature and water quality, but I got some pretty good results at 97 degrees, just short of boiling point. I got some amazingly clean results in my cup, wonderful balances between sweet, acidic and floral flavours. Love it.

As I usually use my modded Kalita Wave 155 in favour of the Aeropress, I still have to optimise my workflow in the morning. I’m also working on a comprehensive recipe for Tim Wendelboe’s coffee brewed on the Wave 155 to get a similar clarity to the Aeropress so I can get more coffee out of each brew.

Always updating


So what’s the deal with all these pointless updates? There are some applications that automatically install updates almost every day (looking at you, Discord). Worst of all, these updates require you to reboot your PC or Mac to install them (looking at you, nextcloud). I mean, what year is it? 1998?

I get it, some applications need to integrate with the Finder or Explorer, or do something to your audio driver, but even Nvidia can manage to update your graphics card drivers without a reboot! Remember what an adventure updating drivers was in 1998?

So please, come on. I just want to use my computer to work on it and not have to update it every time I boot it up.

Travelling


I am going on a business trip this week. I’m looking forward to it because it’s to Oslo. A city with one of the most active third wave coffee scenes in the world. Unfortunately, I will have little to no opportunity to experience it. At least I will see another radio station in the world from the inside.

Or as James Bond antagonist Henry Gupta says, “I hate travelling! never know what to pack!”

Hardening is hard


A few days ago I wanted to update my blog. It turned out, that I’ve locked myself out. Not fully, but my deployment script, that builds the hugo site and loads it to the online webserver using rsync suddenly stopped working with some very cryptic ssh error message.

Of course, I still had ssh access to the server, so I didn’t investigate in that direction. What I had completely forgotten: I had just changed from the default ssh port to a more unusual one and forgot to add this line to the deployment script. If only rsync had given an error message that it couldn’t connect to the server instead of pointing to some arbitrary C library.

I’m still working on strategies to harden my webserver. I see in the logs that it’s unter permanent attack recently. Some are just trying to guess my ssh password. Come on, you Chinese ‘hacker’ with IP 61.177.173.12, known for brute forcing ssh. Don’t waste your time and mine.

But some of the attackers also cause server downtime. I’m not entirely sure what they’re even doing, but it seems to be some sort of DDoS attack that causes the server’s network stack itself to behave in a way that causes a lot of packet loss. But I don’t want to use any CDN in front of the server to protect it, there must be a better solution.

Tunnel


At work I’m creating a new UI. This process takes up almost all of my mental capacity. So no side projects at the moment. Unfortunately, I’m not allowed to tell you what I’m doing. That’s a pity.

To get out of the tunnel, I’ve set up a WhatsApp group with two friends and we try to meet on Zwift to do some sports together remotely on a regular basis. Indoor sports are not that cool, but doing it in a group keeps you motivated.

Updated expectations


A week ago my On Air Clock plugin was accepted for release in the Elgato plugin store.

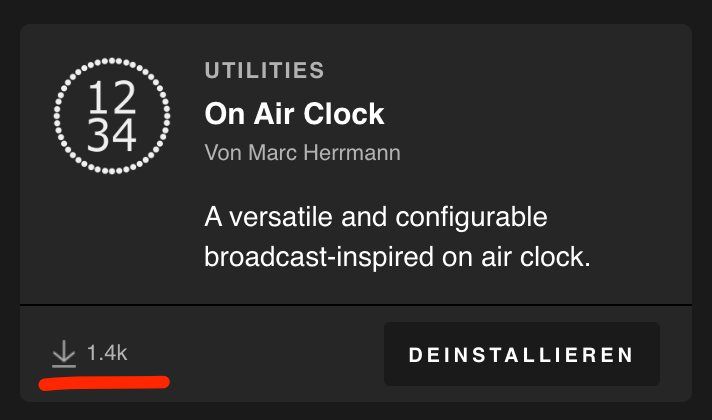
I had expected a few hundred downloads over the next few months if things go well. After only one week it was downloaded over 1.4k times! 🎉

It has already outperformed plugins like Facebook Live integration in terms of downloads. And most importantly, it has exceeded all my personal expectations. Nice to see that my little holiday project seems to have hit a nerve.

Today I submitted an update that brings an internationalization option for the date display, which should be available for download, soon (it’s already available on the project’s github page). So hopefully it can reach even more people!

I continue to appreciate any feedback or feature requests!

plugin download counts

Approval


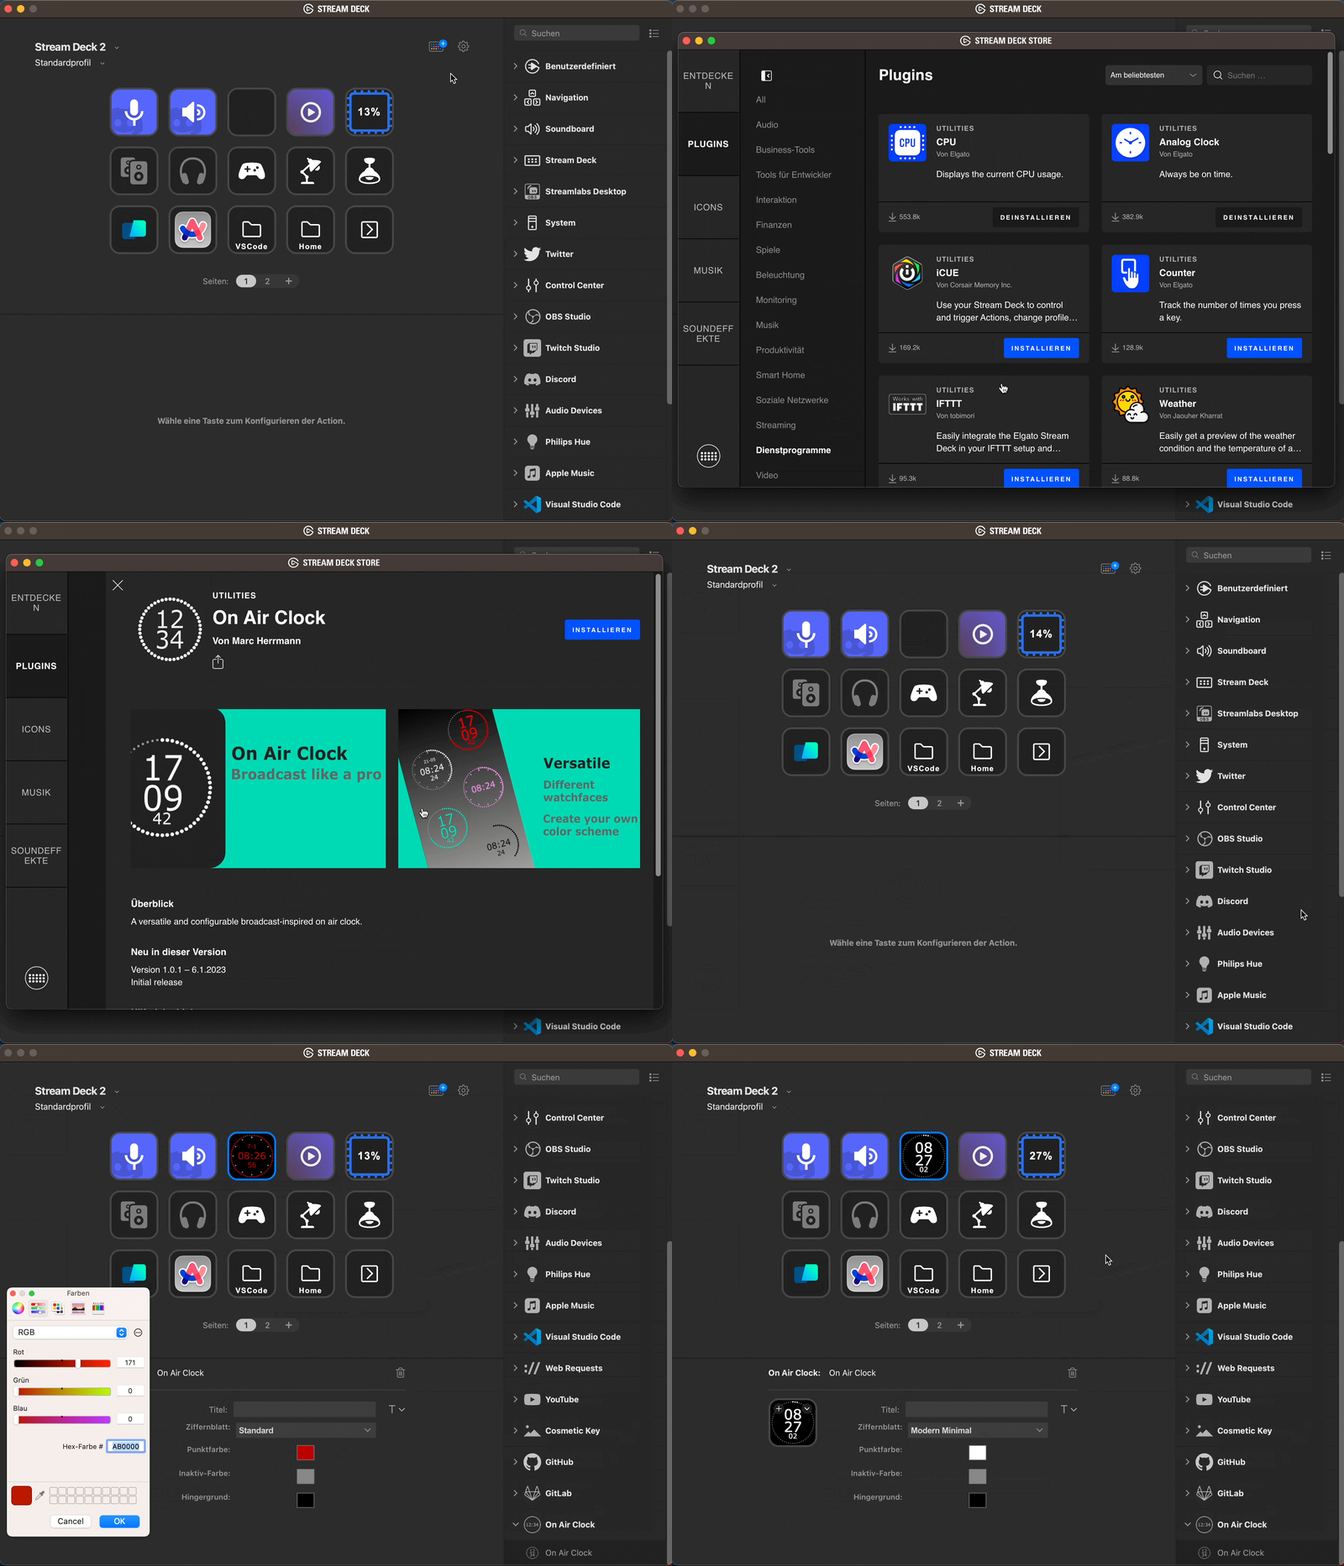
Yippie! On Air Clock finally got approved and listed in elgato stream deck plugin store! Here’s the Link.

install plugin

Finally, this project comes to an end. I learned a lot and have some other Ideas, not that I know how the creation of stream deck plugins works. After just a few hours of being listed in the stream deck store, it already got over 100 downloads. I’m happy everytime I look at my stream deck now!

I’ve also put together a project page collecting all details. For any issues with this plugin, I’ll use the github issue tracker.

RSS


Happy new year! Until a few weeks ago, I had completely forgotten that RSS still exists or ever existed. It was simply wiped from my memory.

A few days ago, the verge posted an article pleading to bring back personal blogging. So, I’m more or less ahead of my time. Or maybe I did return to 2010 and before. But I like it here.

I know, my blog still has no comment function (I guess there wouldn’t be much need for it), but you may write me an email if you feel the need to talk. Until I finally found time to build it.

Long story short. By accident, I found out that Hugo already parses a RSS compliant XML file every time I publish a new post or make changes. So, feel free to follow this blog using a RSS reader and the RSS link alongside the other “social icons”.

Watch faces


After getting the multitasking done and also storing and reading settings works, it’s now time to make the plugin a bit more versatile.

I decided to make the appearance a bit more pleasing by creating different watch face options:

  • Default
  • No Date
  • No Seconds
  • No Date & Seconds
  • Modern Minimal

The first four are basically the default watch face with or without date / seconds displayed. To make things look a bit more modern, I decided to create another watch face that uses the button size more optimal and has a cleaner look, which I decided to call ‘modern minimal’ (ok, it’s not that creative).

In the property Inspector, I’ve just built a select element to choose between those options. That also makes it easy to build some more, if there’s any other new Ideas. On the code side, there are now just different functions to draw different elements, like the dot ring, the scale, the date, the seconds and more. I just use a switch case to choose what to draw.

Also, I decided to use the system color picker for picking the watch face colors, so that users not understanding HEX colors can also easily create their own color schemes.

property inspector

Property Inspector is now more user-friendly. Also supports localisation (English and German).

The only thing I’ve got to do now is get the manifest.json done right, create some graphics for ‘advertising’ it and maybe a good icon. Then submit it and hope to get accepted by Elgato and listed in the plugin store (for free, of course).

Multitasking


Welcome back to part 3 of my stream deck plugin development journey. After I managed to use my canvas code and actually update the display, I thought I had done the most difficult part. But how wrong I was. After implementing input fields in the property inspector to change HEX colors of the plugin, I immediately found out, that the plugin is only run as a single instance by stream deck. Even if you have multiple buttons, it is always a single instance.

Changing a color for one button therefore means changing a color on every button with the clock displayed. And even worse, property inspector (PI) stores the settings per button context, so you could also have a mismatch between actual settings and displayed values.

It took me a whole day to figure out on how to resolve this. I was trying to mimic the nice code style of the analog clock plugin using local cache and other fancy stuff, but after some hours of frustration, I simply gave up on trying that approach. But at least I found out, that every button has its own context and also has somewhere its own properties stored.

Also, I got very frustrated, because I hadn’t found a way of storing a timer ID of setInterval() that I could access in some other function to destroy the clock when the button is removed by user to prevent too many timers running endlessly.

Fiddling around a bit more and in a very bad mood I decided to go the old school way of defining a global array of objects that stores all relevant properties of every single button and that I can access globally. That did the trick. Now I can define as many on air clock buttons I want and feed them with different colors or simply remove them without producing potential memory leaks or other bad side effects.

Don’t get me wrong. I was less frustrated with Elgato’s moderately good SDK documentation than with myself for not understanding the sample code in a way that I could use it for my application.

But now it works! I can now continue making the settings in property inspector a bit more user-friendly.

Multiple buttons with different colors

Multiple buttons don’t lead to multiple breakdowns anymore!

Canvas to Base to git


After I built and refined the canvas drawing routines for the on air clock plugin on stream deck I’m planning, I’m now back to bringing the code actually to stream deck. And I was successful, at least partially.

As written in my last post, I failed to understand how they are updating the view of the stream deck plugin. As an ambitious athlete, I can’t admit defeat so easily and kept digging. Turns out the solution was rather easy, I was just missing the function that did the actual updating in the original analog clock plugin. Or maybe I didn’t just expect that it is that simple.

The flow is as follows:

  1. Instantiate a canvas element in the DOM of the index.html.
  2. Do all the drawing operations required
  3. Convert the canvas data to a base64 encoded png using the js toDataURL() function (shame on me, I was missing on that step)
  4. Update the stream deck button’s image using $SD.api.setImage() API function.

To do this every second, as required within a clock, I just used a setInterval() function with 1000ms (it seems that elgato did some patches on timers for stream deck). The timer is installed with the onWillAppear() action of the stream deck plugin’s app.js.

And it works! Now I have a simple on air clock on stream deck! Yeah!

Stream Deck Software with 3 working on air clocks

Working instance of the onair clock in stream deck software

Unfortunately, I’m not at home and don’t have a physical stream deck with me, so I can just test using the preview software and the stream deck app on my iPhone.

To get started, I used the stream deck plugin sample, minimalised it and put my code inside. Still lots of work required.

As this is now a working prototype and I can begin moving this into a more final version I’ve set up a git repo and put it on github: streamdeck-onairclock

Things feel better when they’re under version control. Especially when I continue to break stuff while experimenting with it. Next up is fiddling around with stream deck software’s property inspector and managing to make the colors configurable by user.

I am not really sure if I want to just put three text inputs there, where the user can put HEX color values or if more user friendly sliders or presets are the way. First I need to manage saving settings and sending them to the plugin.

Also, I’m thinking about making the information displayed configurable. Checkboxes for ‘show seconds’ and ‘show date’ at least.

Canvas Drawings


Recently I got myself an Elgato Stream Deck. I’ve had some fun configuring it, but - besides some scripting functionality - I was missing a decent On-Air Clock for one of my keys.

Coming from the broadcasting industry, I have to say that I love those kind of clock faces. They emit this distinct feeling of a studio and everything associated with it, which I love (as well as studios in general).

So I started studying the Elgato SDK documentation, which is not quite the best, and also started reverse engineering some of their sample plugins. Especially the one which draws the analog clock.

I could not really figure out how generating the plugins works, but at least I got a rough Idea how I could start doing this. Plugins can be made of a variety of programming languages. Of course, being a script kiddie, I decided to use javascript because it gets me there the fastest. Also I learned, that the Elgato developer used canvas to draw the clock.

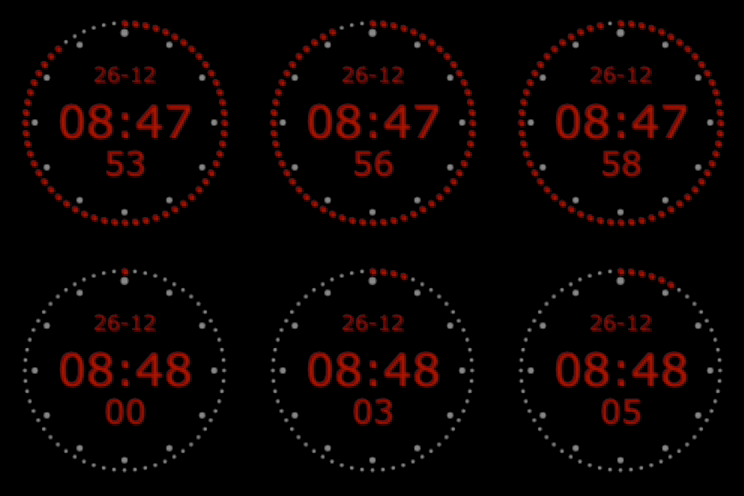
After not really having an Idea how to build the plugin itself, I decided to start with just building a pure javascript & HTML prototype and first getting the code done required to draw the clockface and bring it to live. As I’m not that familiar with canvas drawings and especially not the best at trigonometrics, I was following this awesome tutorial to build a classic analog clock first. Afterwards I started to build a function drawing the 60 dots, then I built a function filling the first X dots by the seconds passed. Afterwards I introduced a scale with the hour marks and printed the time digitally in the middle. This is how it looks like:

On Air Clock Preview

I know it has not the best resolution, but that’s by intention, as stream deck’s display also doesn’t have a high res display. I’m having fun here. With trigonometrics! I guess my old maths teacher wouldn’t believe that.

Now that the clock drawing works, I’ll have to figure out how to put into a stream deck plugin next.

Artificial Intelligence


I’m currently thinking a lot about AI. Don’t get me wrong, I’ve been watching AI tools and use cases progressing actively the last years. But within the last months, the first AI tools were released or at least partially released even for consumers and nerds like me, that could make a tremendous difference in how we work and live.

I asked Dall-E 2 to paint a Robot painting a robot

I asked Dall-E 2 to paint a Robot painting a robot. © - Who to credit? Dall-E..? Open AI? Myself?

AI has the potential to bring numerous benefits to society, including increased efficiency and productivity, improved healthcare and education, and enhanced safety and security. Some examples of AI in action include self-driving cars, virtual personal assistants, and intelligent tutoring systems.

In fact, I used this Blog as a little application playground for what I can do easily with AI. The Picture of myself in the top left corner in front of the planets? AI-Generated (Stable Diffusion). The Dark / Light color schemes? AI-Generated (Chat GPT). The paragraph of text above describing positive impacts of AI? AI-Generated (Chat GPT).

Of course, AI may also have negative impacts on society (better ask ChatgGPT to write an essay about that topic). But in the moment I just see how much easier an actually useful AI that doesn’t just pretend to be one for marketing purposes (no offense, Alexa & Siri) can make my life.

I’m also thinking about other forms of useful AI, especially in my homeland, the Audio industry. But as audio is much more data and training data is harder to access than ‘just’ images or text, that may be some topic for the future.

removed my face from the logo

I removed my face from the left picture and asked dall-e 2 to fill the empty space.

Access Log


Logging and statistics are quite a sensitive topic nowadays. Some say knowing how many users and generally just how users use a particular service is important to build better products. Others say that analyzing product usage is equivalent to spying. I’d say - as a product developer and also a fan of data protection - the answer lays somewhere in between. It’s not so much about how and if data is collected. It’s more that just the required data is collected and equivalently stored. And, if it’s a paid product like my iPhone, I personally want a clear communication how and what data is collected and how to opt out.

I’ve setup this blog now, as described in my previous posts and I will continue this as just a little side-project to craft something. But before I continue working on the style and other stuff I have in mind, I want to know how many people visit this page. If I had to guess, I’d say it’s just me and the google index robot (and maybe my wife checking out what I’m wasting my time with). But you never know.

I hate google analytics, matomo and all the other professional “spy solutions” using massive databases, cookies and more. And I love minimalist approaches. So I just take what’s already there. The access log of NGINX, which runs as the webserver. (I use to say engine x by the way, as this is a long lasting discussion topic somewhere and has finally been settled by the nginx developsers)

What’s inside the acces log?

NGINX logs all the resources a client (by IP) is accessing as well as status code and user agent and some more information. That’s what every web server does by default. The thing is with log retention. By default, logrotate.d is set t keep logs for 52 days. As my webserver is not running for so long in the moment as I’m constantly changing things, I just have no Idea if that’s true. I’ll have to test it. First of all, I set the NGINX docker container to save access log to a persistent volume.

But how to do statistic with a log file?

After some googling, I found a tool called goaccess. It is a command line based log file analyzer. As a little bonus, it can generate a report html file, which presents the log file data in a nice gui instead within the command line.

Great Idea, just put a report.html on your server, so everyone can view it!

I get the irony. No, I’m not that stupid. Every hour or so, I generate the newest report in a non-accessible folder and transfer it to a local machine here. The command to generate the report is:

cat /path/to/logs/access.log | docker run --rm -i -e LANG=$LANG allinurl/goaccess -a -o html --log-format COMBINED - > report.html

(docker required)

I’ve put that into a script and do an scp to transfer the log files from my webserver to my local machine at home within the same script. That script is executed by a cronjob every hour.

I run another little NGINX webserver at home to just view the recent report. As logrotate deletes data older than 52 days, this should be GDPR compliant and will automatically be deleted on my local machine as well.

So, let’s see if I’m right and nobody even reads this stuff here!

Speciality Sweetspot


I visited Hamburg last weekend. Primarily to watch the musical Hamilton, which was awesome.

But I’ve also been visiting some spots where you can enjoy a great cup of speciality coffee, handbrewed or flat white, no matter, always a decent sip. Five or even more years ago, that was a secret tip to visit those spots. And there weren’t many. Probably I’ve spent more time sipping flat white or handbrew at tørnqvist (the bulli or the pop up store), nerding around with Linus about coffee, or the original elbgold roastery, also enjoying some amazing cheesecake with my flat white. And so many other amazing coffee places in Hamburg, Berlin, Leipzig.

Amazing elbgold cheesecake & flattie

But back to Hamburg. Today, tørnqvist is no more. Elbgold is still famous, but in fact so famous that you might sometimes wait 10+ minutes in a long cue just to get a flat white to go, no chance of getting a table at all.

What happened?

I was wondering what happend. I think something inescapable that happened to other things before, too: when something is really amazing, kind of exclusive (or at least expensive) and becomes ‘hip’, people will also get a taste for it or at least believe that it’s good, because everybody else of their peer group likes it. So you go there on the weekend to treat yourself maybe. Of course that’s amazing! All the people passionate for speciality coffee who have founded or work in speciality coffee finally get the success they deserve! And when more people pay attention to direct or fair trade, slow roasted, excellently brewed speciality coffee, what should be bad about it?

The tradeoff

The obvious tradeoff is, that the early adopters and people who really appreciate the actual art of coffee farming, processing, sourcing, roasting, grinding and brewing, tend to loose their interest or motivation in having a good sip and some coffee nerd to coffee nerd conversation from by swinging by their favourite coffee place. On the other side, the true coffee nerds will leave the hipsterized coffee place or even the coffee business, as many ‘mainstream’ customers mean more repetitive work for the masses who don’t really appreciate it instead of crafting uniquely tasty coffee experiences. More Starbucks, less speciality.

Of course, there are - and will always be - the little islands of silence and paciently brewed coffee, but they’re increasingly hard to find. Especially if you, like me, decided to not follow every trend any more and drop out of of instagram, the central tool for coffee nerds to connect.

But that’s the thing with buinding a business. Grow and eat or die. There’s no way to stay little and secret if you want to survive as a business. Especially with a pandemic situation you gotta survive somehow. I get that.

And now

I’ll continue to enjoy my 100% first world problems and just brew my excellent cups of handbrew at home. Maybe I can - at some point - also call a portafilter machine my own and create my own great flat whites. But I haven’t yet found a way to replace the coffee nerd conversations.

Marchie


Recently I decided to start a blog based on hugo and archie theme. There I mentioned that I liked the Idea of versioning the whole website and it’s contents using git. But I totally messed up the repo by trying to clone the theme’s repo to my own repo and apply changes locally. I expected the whole theme files, including changed ones, would then be pushed to my own repo. Turns out: nope. Next I tried to change the remotes, turns out that was also not the right way to do it.

Woah, that sounds stupid, how did you moron fix it?

Good question! The solution was simple, using a submodule, but it took me a while to figure it out. I created another empty folder on my local machine and git clone’d the theme’s repo into it.

Afterwards I removed the original remote origin url and replaced it by my own github repo I created in advance:

git remote set-url origin https://github.com/wortkrieg/<private git name>.git

Checking back using git remote -v told me: it worked! Yay! I can now

git commit -a
git push

my changes to my own repo.

Okay, but how did you bring this separate repo to your weblog’s repo?

That was also easy. cd to the /themes/ folder of hugo and run

git submodule add https://github.com/wortkrieg/<private git name>.git
git submodule update <private git name>

Coolio, but how do you handle changes within the submodule?

When I now apply changes to the theme in my theme’s repo, I simply git commit and git push them. After that, I cd into the /themes/ folder of this weblog’s repo and run

git pull

That’s all. That did the trick. I’m slowly starting to get this whole git thingy.

some may ask: ‘why didn’t you just create a fork using the big fat button within github?’ There are two reasons. First, github forks are always public and I hate putting everything in public. Maybe I’ll make the repo public later when there are changes worth sharing. Second, I’d be more dependent on github and I already think about moving to another (maybe self hosted) git. So I wanted to learn how to do it platform-independent.

Hugo


Recently I was looking for an alternative to the boring, feature-bloat and slooooow wordpress. Hosting wordpress is a nightmare nowadays, and using it has become a true pita. I don’t need all of those features. I hate, that it requires so many plugins to work correctly. And I hate, that I have no or less control about what it is doing in the background. And I really hate, that every update brings even more complexity and features I really don’t need. I just wanted to blog or create static, fast sites.

So I was playing around with:

  • typemill (not really designed for blogging, but still quite cool)
  • next.js (too complex for a guy with less time)
  • zola (maybe cool, but couldn’t get it working on first and second try)

After all I ended up using hugo.

I’m new to the jamstack and I’m also still learning how to use Hugo, but it is well documented and it brings you fast to a reasonable result. And the themes available are.. okay. (No offense!) And it is written in the recent hype-language go. In my job, where I design and manage digital products, I have a team of great deveolpers I can rely on. But here I need to figure things out on my own. So I love well documented, easy and fast frameworks, where I can spend more time creating contend and infrastructure than learning just another tool.

Another thing that’s new to me is writing in Markdown, as I’m more used to the Dokuwiki Syntax, of which I’m quite a heavy user at work.

Getting up and running

To start developing and writing, you just need to install it according to the docs mentioned above and start a development server.

Executing these commands gets you up and running:

hugo new site sitename
cd sitename
hugo server -D # -D option to show drafts

Another cool and time-saving feature for noobs like me is the new command to add new posts:

hugo new posts/hello-there.md

For versioning, git is recommended, of course.

The command

git init

makes it into a git.

Basically I have no Idea how to use git and completely messed up my repo so far. I’m still learning.

Deploy

And finally you might deploy that whole stuff somewhen. If you use a dockerized, dead-simple nginx webserver like me, things are very easy. Building happens using hugos builtin deploy mechanism. To sync to a folder on my server, I thought of using rsync. Turns out, hugo already has a builtin way to use rsync for publishing. Nice!

So I just created a sh file called deploy and put the following contents in it:

#!/bin/sh
USER=my-user
HOST=my-server.com
DIR=my/directory/to/site/   # the directory where your web site files should go

hugo && rsync -avz --delete public/ ${USER}@${HOST}:~/${DIR} # this will delete everything on the server that's not in the local public folder 

exit 0

Made it executable using chmod +x deploy and executed it via ./deploy. Make sure to put your ssh key to the remote server before executing the script as it runs without password authentication. Miraculously the files showed up on my server and the website was.. totally broken. After digging a bit I found out permissions were messed up, but manually fixing them didn’t do the trick. Rsync always chowns the files to the user uploading it. So after the rsync I just executed a chown 1000:1000 ./files -R and everything works as expected. The full script is then:

#!/bin/sh
USER=my-user
HOST=my-server.com
DIR=my/directory/to/site/   # the directory where your web site files should go

hugo && rsync -avz --delete public/ ${USER}@${HOST}:~/${DIR} # this will delete everything on the server that's not in the local public folder 
ssh ${USER}@${HOST} 'chown 1000:1000 /html -R' # fix permissions

exit 0

Yay! I have a Blog now!

Hello There


This is my new weblog. After Twitter and everything else are evil nowadays, I’m now just back to the roots. My first intention to build this blog was, because I wanted to try out the flat file framework hugo.

Hello There

I blogged my first time in 2010 or so. At that time it was about music, I had the blues, so to say.
My great role model at that time was the Boschblog. Funny enough @bosch is still blogging.

At some point I have then lost my interest in blogging. Unfortunately, I’ve also lost my wordpress installation somewhen after a failed backup. Maybe archive.org still knows some of my old contents. I should go and check it out.

Some time later, I started blogging on medium. I’ve had a solid audience over there, and got also listed at the medium auf deutsch publication from time to time. Topics there differed from my first blog. Now it was on politics and random thoughts on daily stuff. Like the relation of time and space. Or paper vs. plastic bags (I still hate paper bags).

But somewhen medium decided to become commercial and make money out of my content. So I started to move my content to a new blog, which I called wortkrieg (that’s still my handle on many social platforms). I’ve also added some content on my thirdwavecoffee-addiction and thought about making a hybrid blog-podcast-format. I was struggling on having enought time to blog besides my daily business. So I’ve put this blog offline, too and just focused on instagram, reddit, strava.. whatever.

I dropped most of my social media last year and removed instagram, twitter, facebook, reddit.. from my phone (I can just recommend this step to everyone).

Since ending my last blog and social media, I’ve started several projects to improve our home network, become a better rower (on the water, of course), started road cycling and more projects. Maybe I’ll blog about some of them, somewhen.

Ultimately, consider this Blog as a big brain dump, which I need from time to time.